
Docker for .NET Developers: Easy and Practical Guide
Introduction to Docker: What It Is and Why It Matters
If you use Docker daily in your work you can skip reading this article because it is dedicated to those approaching this world for the first time. So what is Docker in simple words?
Docker is a special kind of software that helps you put your programs into “containers.” These containers hold everything your program needs to run, like code, libraries, and settings. Docker makes it easy to run your programs on different computers without worrying if they’ll work the same everywhere. In short, Docker makes the process of developing and deploying software faster and more reliable.
Containers are frequently likened to smaller virtual machines, yet this comparison, while understandable, is incorrect. Repeat with me…Container are not smaller VMs.
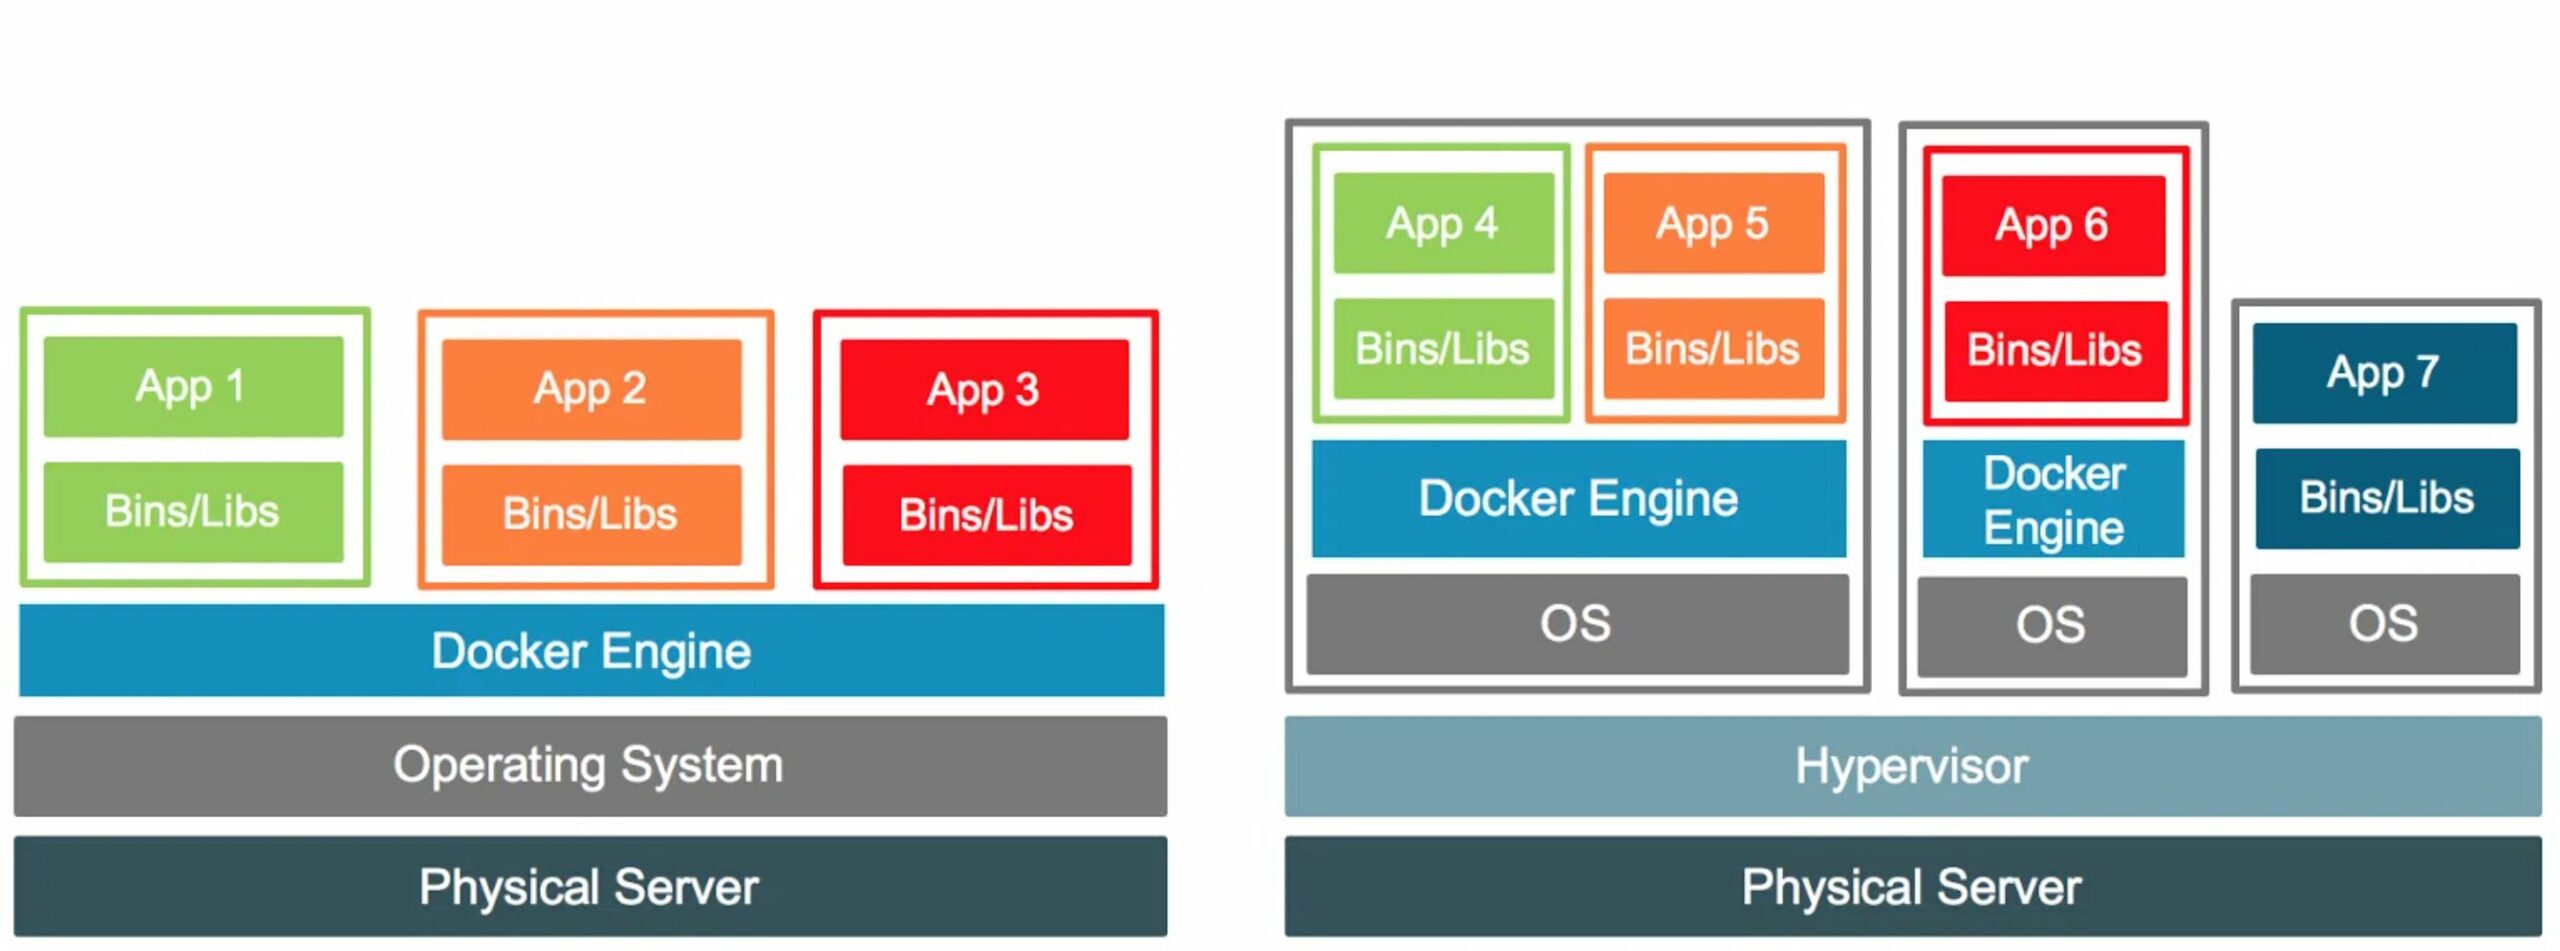
The key distinction lies in the fact that virtual machines virtualize hardware, while containers virtualize operating system kernels. But what does this actually mean? The following diagram illustrates the execution of applications on containers (left) versus virtual machines (right). Virtual machines operate atop a platform known as a hypervisor, responsible for translating operations performed on emulated hardware (memory, processors and disks) within virtual machines, into operations executed on real hardware within their hosts. While this approach offers considerable flexibility, it comes at the expense of disk space, as emulated memory and disks require storage.
On the contrary, containers operate within container runtimes. These runtimes collaborate with the operating system to allocate hardware resources and replicate files and directories, including those containing your application, into an environment that closely resembles any other application running on the system. Unlike hypervisors, container runtimes do not perform any translation. Each application and container utilize the same hardware and operating system as the system they’re deployed on. This enables applications within containers to start up swiftly. By design, containers can only execute a single application at a time. Furthermore, since containers share the same operating system as their host, they have visibility into the host’s activities.
Installation: Getting Docker Up and Running
Initially, Docker was compatible only with Linux due to its reliance on Linux kernel features for containerization. However, solutions like Docker Engine for Windows and Docker Desktop for Mac have since enabled Docker to run on Windows and macOS, respectively, broadening its accessibility to developers across different platforms.
Since 2021, the Docker license has changed, requiring a paid subscription (Pro, Team, or Business) for commercial use of Docker Desktop within companies with more than 250 employees or exceeding $10 million in annual revenue
While there are many free alternatives (Podman, Colima, Rancher Desktop, etc) to Docker for enterprise use, for personal projects, I recommend using Docker Desktop, which is available for PC, Mac, and Linux.
To install Docker Desktop on a Mac, you should have at least 4 GB of RAM available and be running the most recent versions of macOS to ensure compatibility and optimal performance.

Once Docker Desktop is installed, you can use the docker run command to download and run the “hello-world” image as follows:
- Open your terminal or command prompt.
- Type the following command and press Enter:
docker run --rm hello-world- Docker will attempt to find the “hello-world” image locally on your system. If it’s not found, Docker will automatically download the image from Docker Hub, which is the default repository for Docker images.
- Once the “hello-world” image is downloaded, Docker will create a container from it and execute the specified command, which in this case is to print a “Hello from Docker!” message.
- After the process completes, you should see the message indicating that Docker is working correctly.
--rm: This flag tells Docker to automatically remove the container once it’s stopped.
Congratulations, you have successfully run your first container using Docker!
Getting Started with Docker: Creating a Sample Console App Project
In this section, we’ll demonstrate how to create a Docker image from a simple console program written in C#.
Prerequisites
- Microsoft C# for Visual Studio Code extension.
- Docker and the VS Code Docker extension.
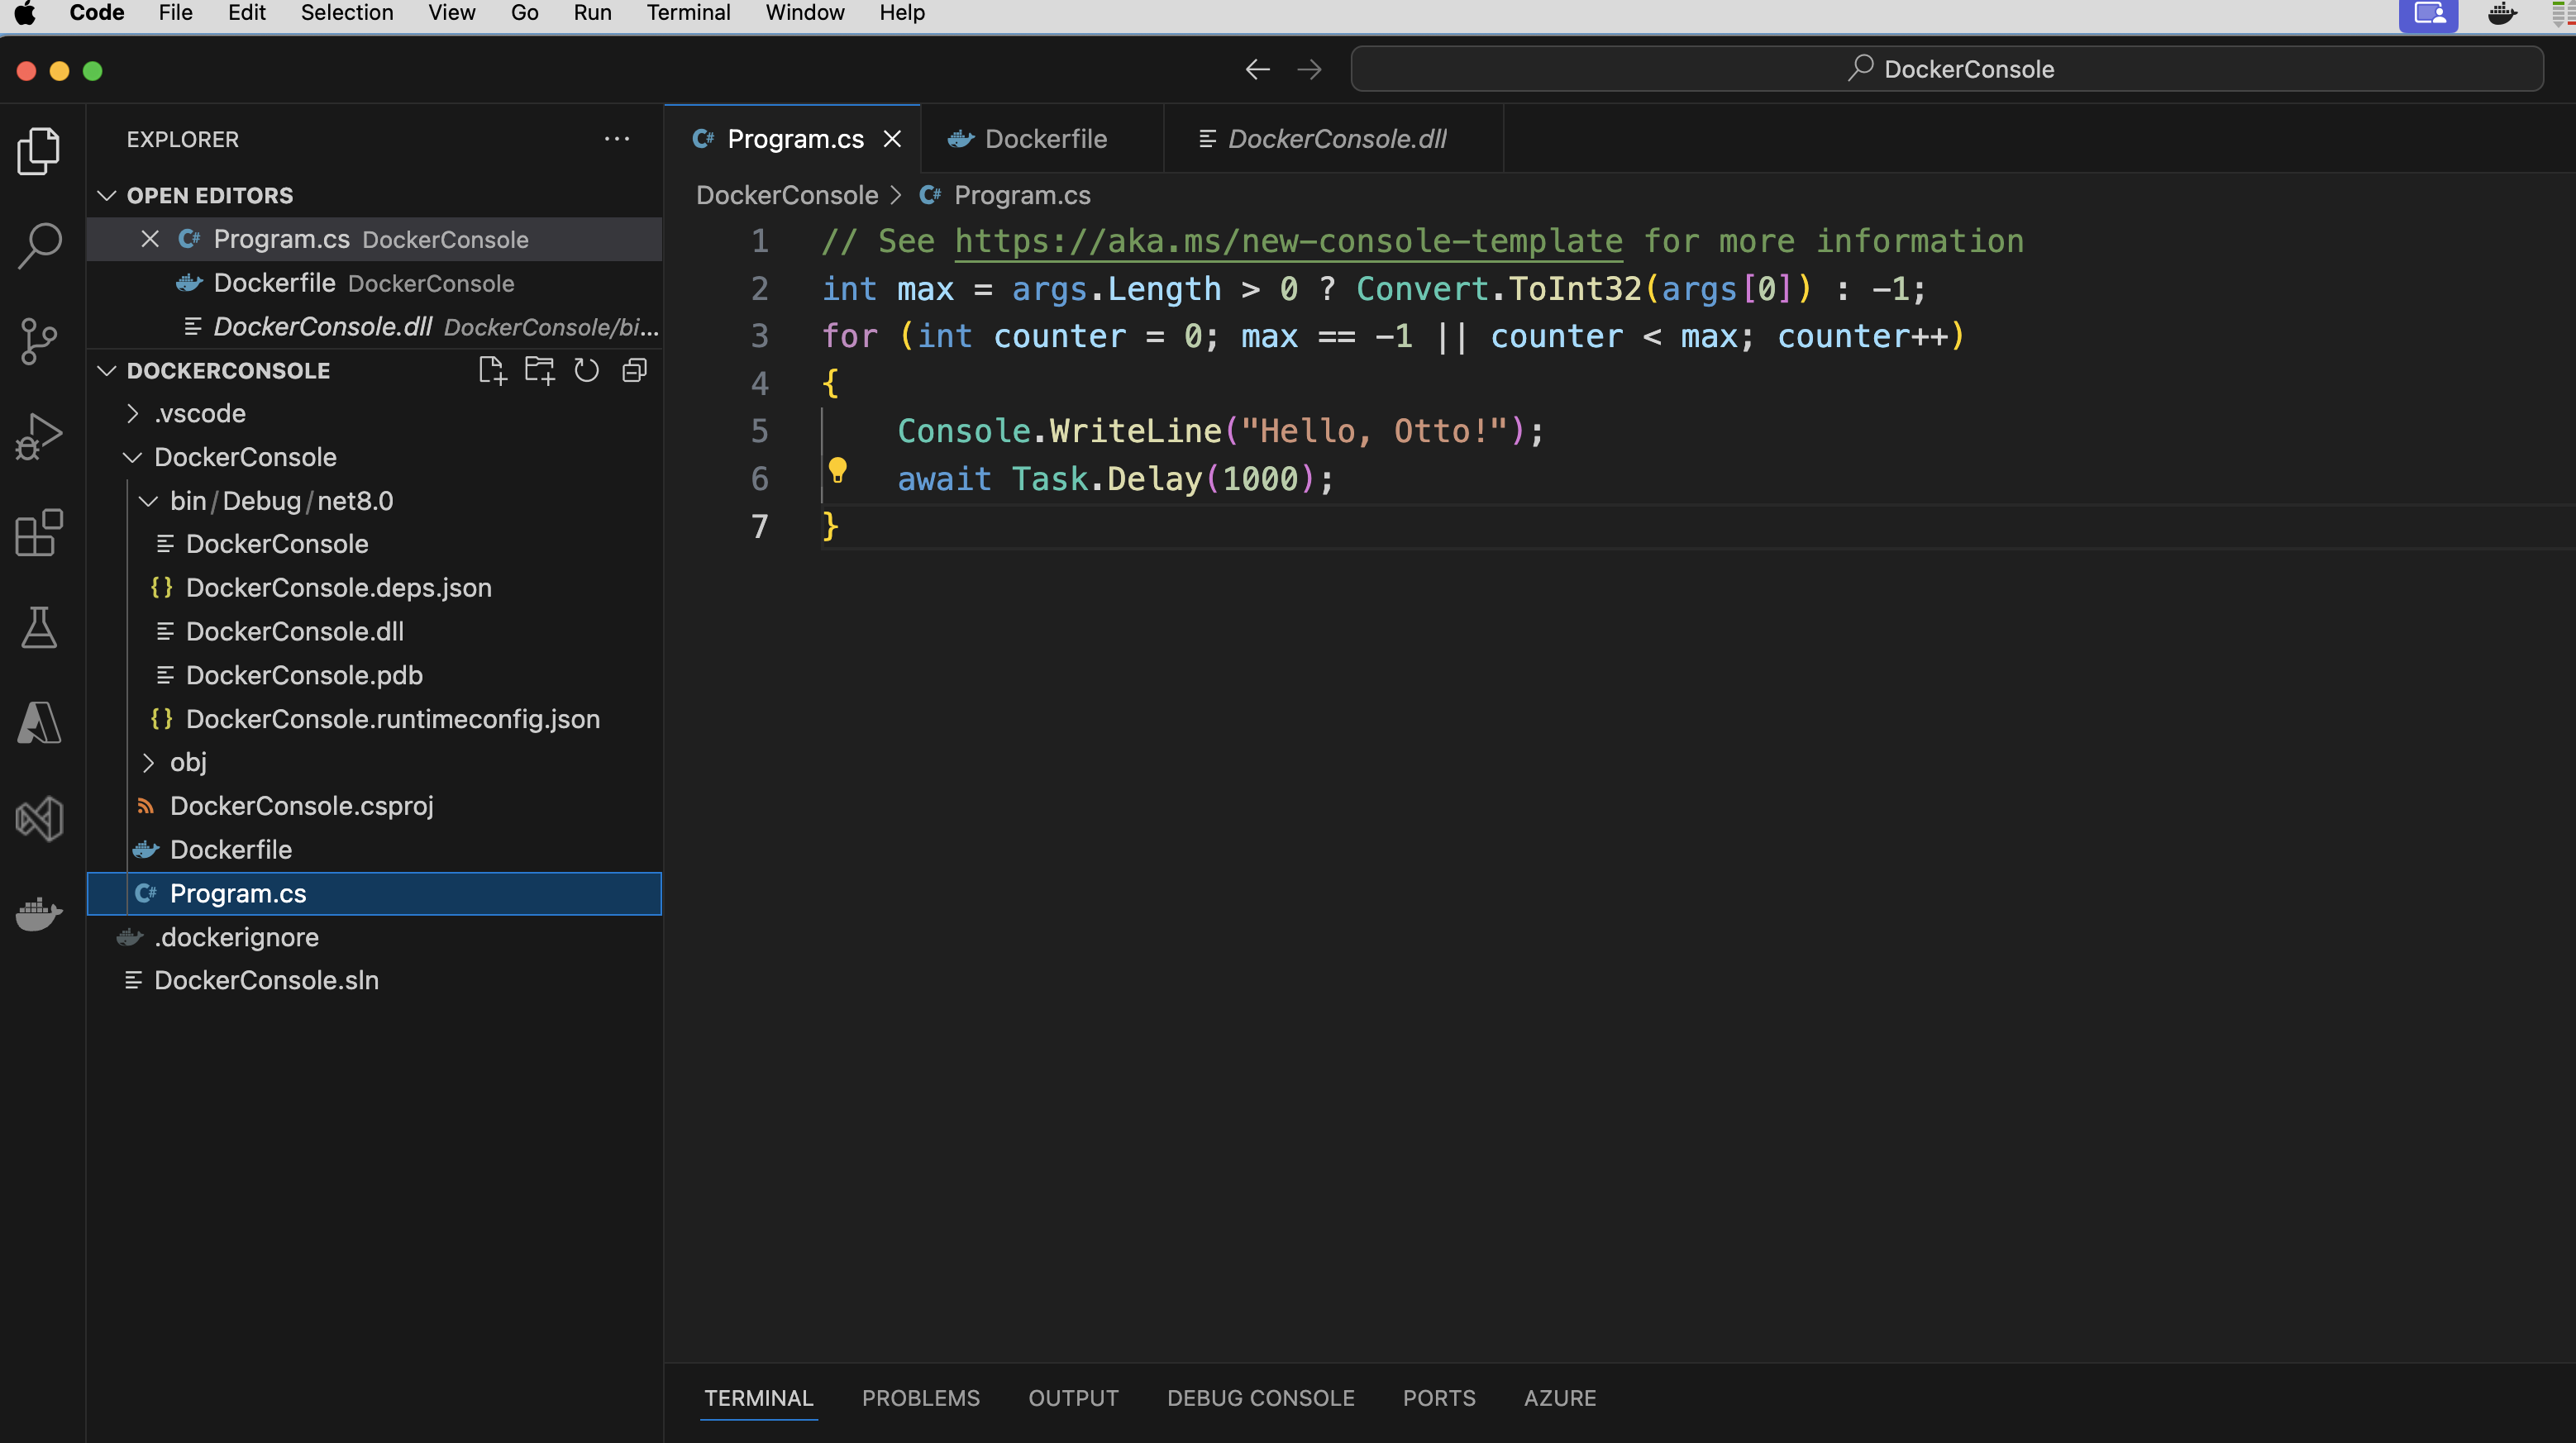
We’ll modify the program to allow the printing of the message ‘Hello, Otto!’ either continuously or a specified number of times using a parameter. If no parameter is specified, the program will be designed to print the message continuously.
Here’s the modified code of the console program:
Now it’s time to create a Dockerfile, it defines the environment and configuration of the containerized application, specifying what dependencies to install, what files to copy, and what commands to run.
You can create it either using the Docker extension for VS Code or manually.
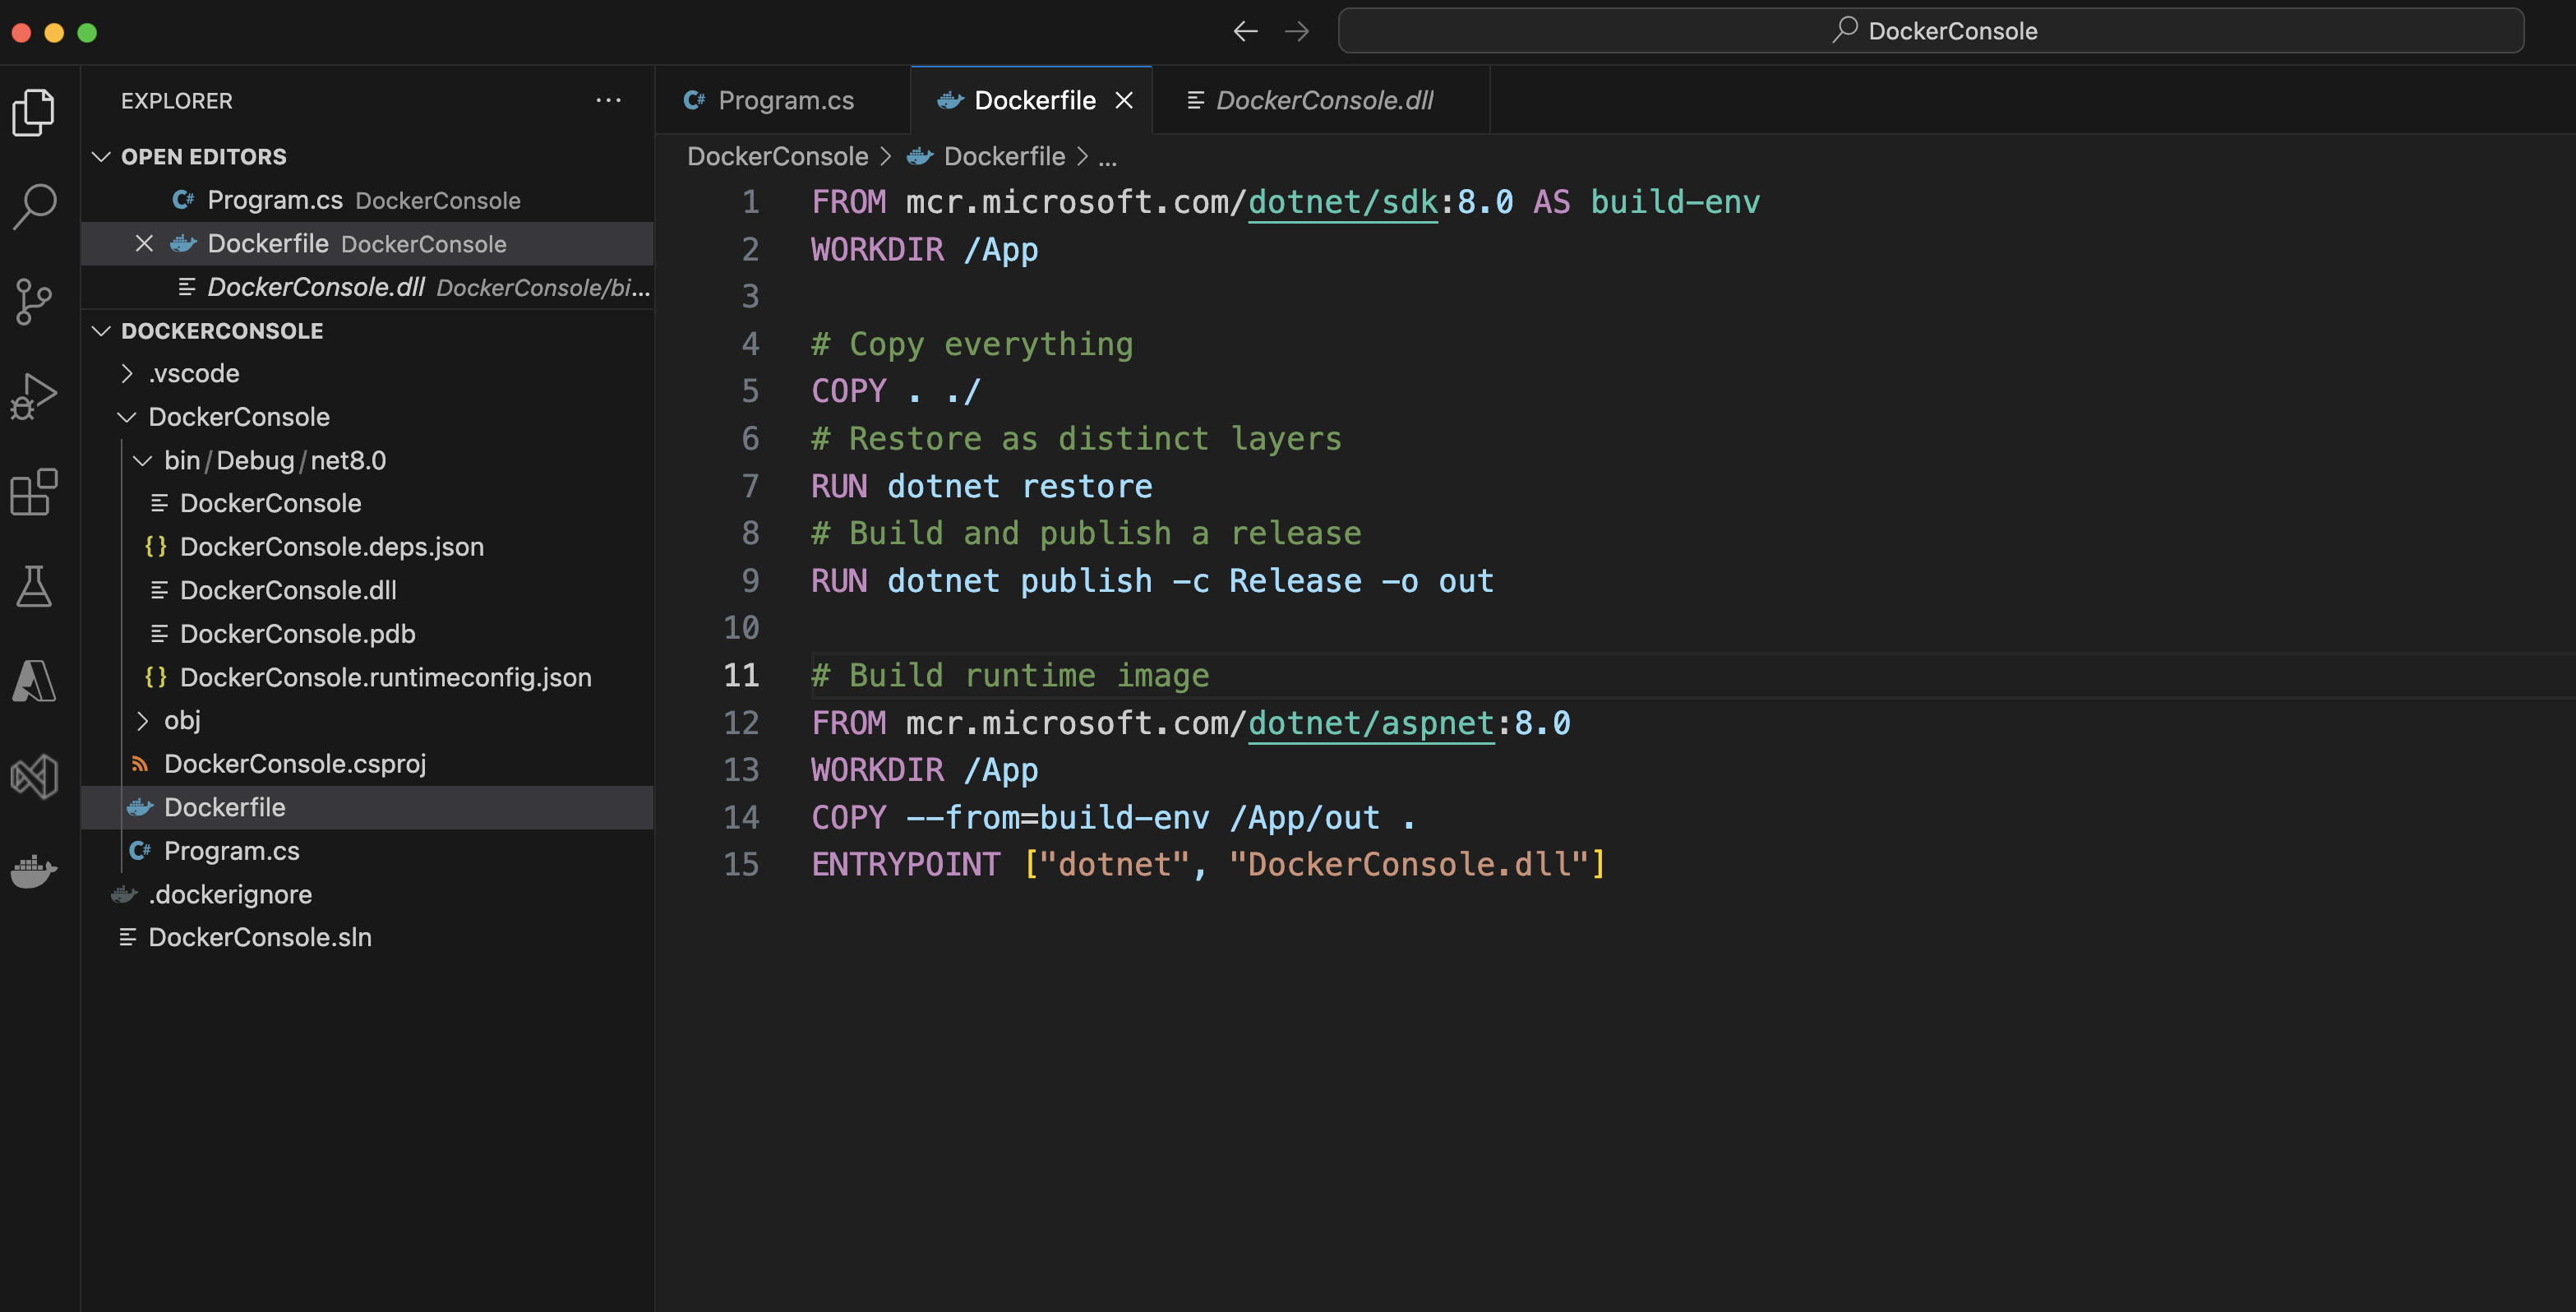
Creating a Dockerfile can be challenging the first time, but there are tools available to assist. I recommend checking out this link. I’ll briefly explain the basic commands.
FROM mcr.microsoft.com/dotnet/sdk:8.0 AS build-env: This command specifies the base image to use for building the application. It pulls the .NET SDK image version 8.0 from Microsoft Container Registry (mcr.microsoft.com) and assigns it an alias ‘build-env’ to reference it later.WORKDIR /App: This command sets the working directory inside the container to ‘/App’, where all subsequent commands will be executed.COPY . ./: This command copies all files and directories from the current directory (where the Dockerfile resides) into the ‘/App’ directory in the container.RUN dotnet restore: This command restores the NuGet packages required by the .NET project.RUN dotnet publish -c Release -o out: This command builds and publishes the .NET project in Release mode and outputs the published files to the ‘out’ directory.FROM mcr.microsoft.com/dotnet/aspnet:8.0: This command specifies the base image to use for the runtime environment. It pulls the ASP.NET runtime image version 8.0 from Microsoft Container Registry.WORKDIR /App: This command sets the working directory inside the container to ‘/App’ (same as the build stage).COPY --from=build-env /App/out .: This command copies the published output from the build stage (using the ‘build-env’ alias) into the current directory of the runtime stage.ENTRYPOINT ["dotnet", "DockerConsole.dll"]: This command specifies the entry point for the container. It defines the command to run when the container starts, which in this case is executing the .NET application ‘DockerConsole.dll’ using the ‘dotnet’ command.
Creating Your First Image and Container: Running Your Applications with Docker
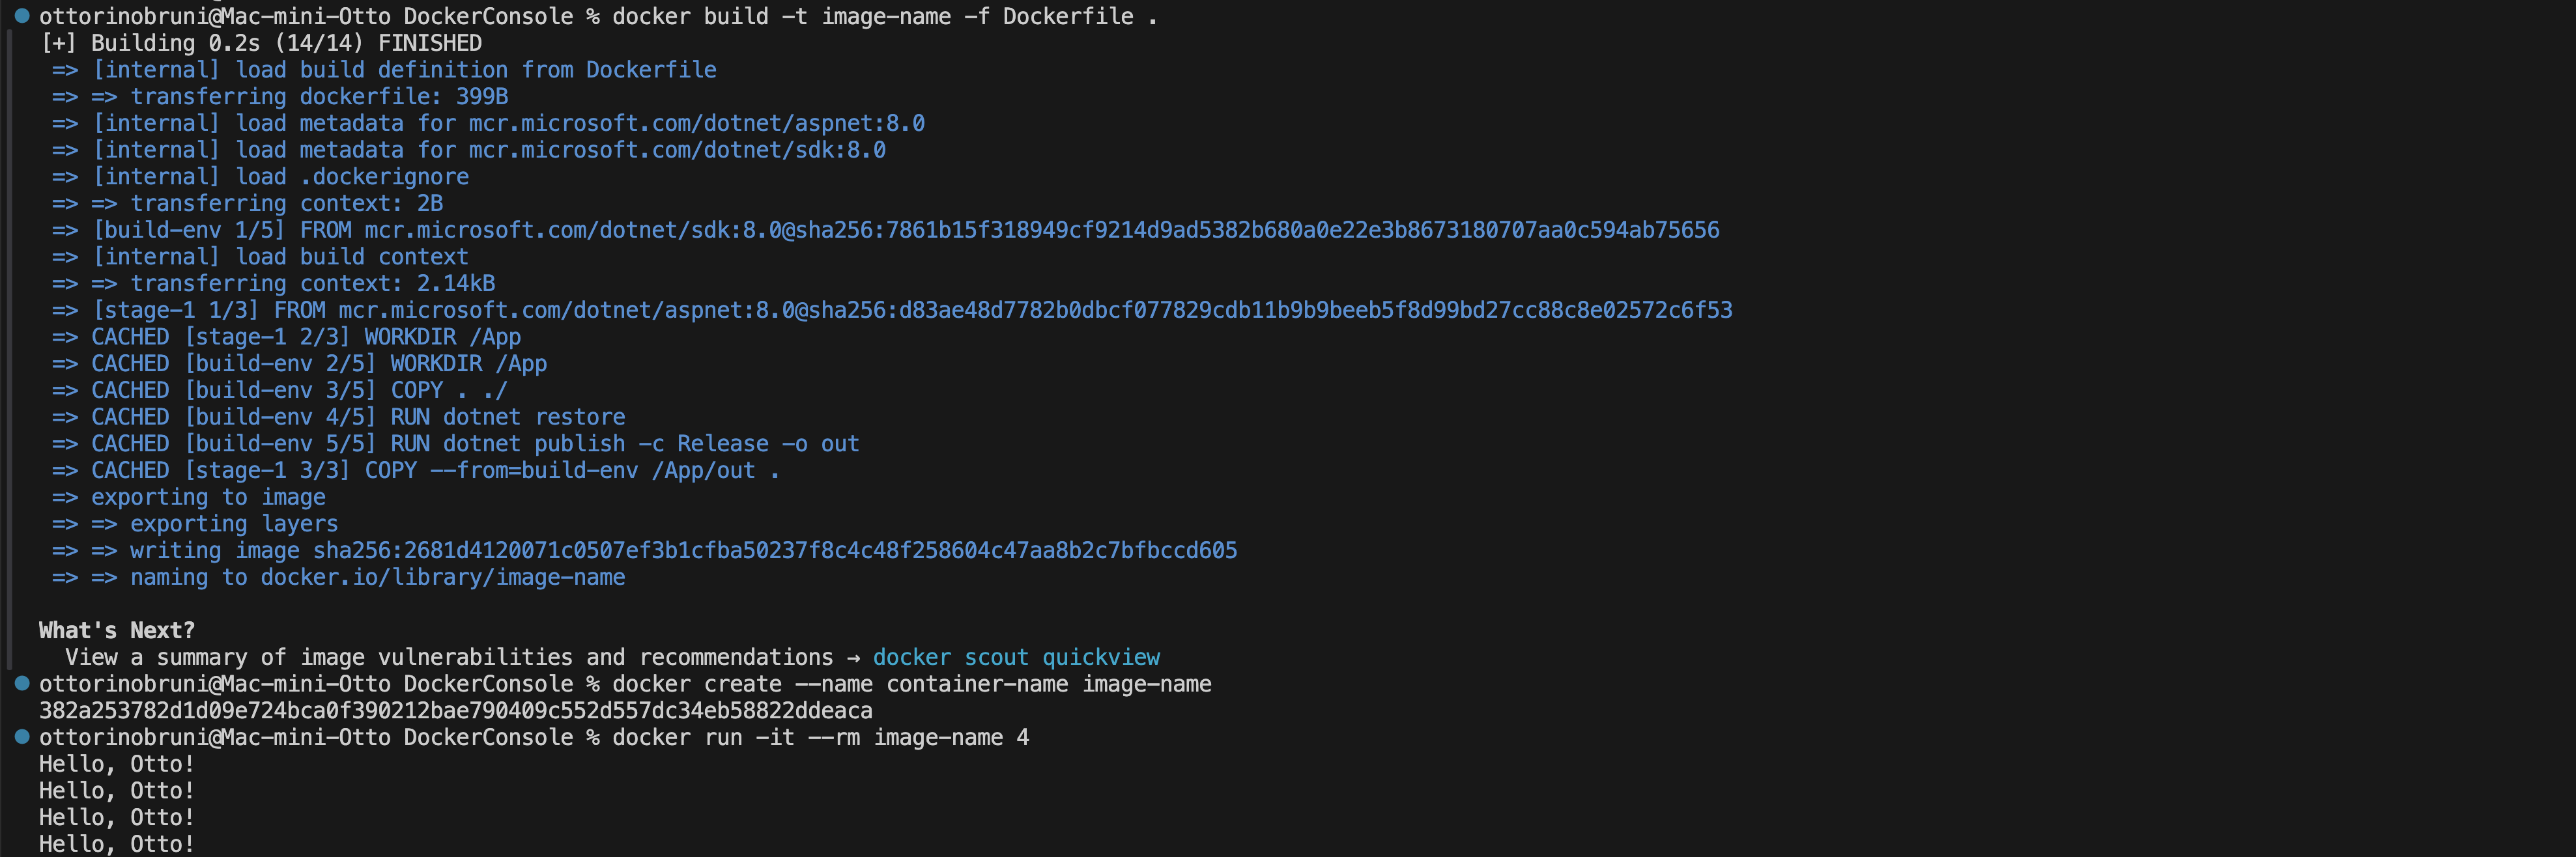
And finally, we create our first image using the command:
docker build -t image-name -f Dockerfile .
The command docker build is used to build a Docker image from a Dockerfile:
-t image-name: This option specifies the name/tag of the image being built. Replaceimage-namewith the desired name for your Docker image. The-tflag is short for--tag.-f Dockerfile: This option specifies the path to the Dockerfile to use for building the image. If the Dockerfile is in the current directory and namedDockerfile, you can omit this option. Otherwise, replaceDockerfilewith the path to your Dockerfile..: This argument specifies the build context, i.e., the path to the directory containing the files used in the build process. By default, Docker looks for the Dockerfile in the current directory unless specified otherwise.
Perfect, our image has been created with the previous command, and now it’s time to create our first container with this command:
docker create --name container-name image-name
The docker create command is used to create a new container from a specified image. Here’s a breakdown of the command:
docker create: This is the main command used to create a container.--name container-name: This option specifies the name you want to assign to the container. Replacecontainer-namewith your desired name.image-name: This is the name of the Docker image from which you want to create the container.
Now it’s time to execute our container with this command:
docker run -it –rm image-name 4
Let’s break it down:
docker run: This command is employed to create and start a new container.-it: These flags combine two functionalities:-i: Keeps STDIN open even if not attached, allowing interaction with the container.-t: Allocates a pseudo-TTY, facilitating a terminal-like interface. Together,-itenables interactive mode, enabling interaction with the container’s shell or command prompt.
--rm: This option ensures that the container is automatically removed after it exits. This helps in cleaning up resources and avoiding clutter from unused containers.image-name: This specifies the name of the Docker image from which the container is created.4: This argument is passed to the container. Its specific function depends on how the container’s entry point or command is configured.
As for alternatives, one could use the docker create command followed by docker start to achieve similar results. However, docker run combines these two steps into one, making it more convenient for simple cases.
Once our work is done, it’s time for some cleanup. This involves removing any unused containers and images from the Docker environment. The reason for this cleanup is to free up disk space and resources and to maintain a tidy development environment.
Here are the commands to perform cleanup:
docker stop: This command is used to stop one or more running containers. Exampledocker stop container_name_or_iddocker rm: This command is used to remove one or more containers. It permanently deletes the specified containers from the Docker environment. Example:docker rm container_name_or_id.docker rmi: This command is used to remove one or more images. It permanently deletes the specified images from the Docker environment. Example:docker rmi image_name_or_id.
By running these commands, you can ensure that your Docker environment remains clean and efficient, with only the necessary containers and images present. This helps in avoiding clutter and conserving resources on your system.
Conclusion: Harnessing the Power of Docker
In conclusion, Docker may seem daunting at first, but it’s a powerful tool that can significantly simplify the development process. By harnessing the power of Docker, developers can enjoy improved consistency, portability, efficiency, and workflow automation, ultimately leading to faster development cycles and more reliable deployments. As you continue to explore Docker, you’ll likely find it to be an indispensable companion in your development journey.
Here are some reasons why Docker can be considered a great ally in everyday development:
- Isolation and Consistency: Docker provides a lightweight and efficient way to encapsulate applications and their dependencies into isolated containers. This ensures consistency across different environments, from development to production, reducing the “it works on my machine” problem.
- Portability: Docker containers are portable and can run on any platform that supports Docker, whether it’s a developer’s laptop, a test server, or a production environment. This portability makes it easy to deploy and scale applications across different infrastructure environments.
- Resource Efficiency: Docker containers share the host system’s kernel and resources, resulting in minimal overhead compared to traditional virtual machines. This efficiency allows developers to run multiple containers on the same host without compromising performance.
- Streamlined Development Workflow: Docker simplifies the development workflow by providing a consistent environment for building, testing, and deploying applications. With Docker, developers can easily package their applications into containers, share them with teammates, and deploy them to production with confidence.
If you think your friends or network would find this article useful, please consider sharing it with them. Your support is greatly appreciated.
Thanks for reading! 
🚀 Discover CodeSwissKnife, your all-in-one, offline toolkit for developers!
Click to explore CodeSwissKnife 👉